Creating a Google Cloud Deploy bot on Google Chat

Are you using Google Cloud Deploy? Would you like to get notifications on releases, rollouts, approvals and rejections? And even create new releases and roll them out? If yes, keep reading. If no, keep reading anyway :)

First, we’ll start with a few assumptions:
- You have a Cloud Deploy delivery pipeline set up, with a Git repository
- You are using Google Chat (or at least have Google Workspace set up)
I’ll provide full Terraform code alongside with some manual set up instructions that aren’t covered by Terraform.
First a little background. Since a couple years ago, I’ve been slowly but surely building a tool called Pubsub2Inbox. Originally it started as a simple way to push a message to Pubsub2Inbox and have it delivered via custom SMTP servers or Sendgrid. Since then it has evolved into a multi-purpose “swiss army knife” for Pub/Sub and Cloud Functions (and Cloud Run too).
It’s written in Python, based on concept of processors and outputs, glued together by a liberal sprinkle of Jinja and lots of helpful Python libraries. It provides out of the box mechanisms that you’d need to implement yourself, such as message de-duplication, automatic handling of repeatedly failed messages and so on.
In this example, we’ll be chaining together quite a few different processors from Git checkout to file archive compression and show just how customizable it can be. It’s best suited for simple to medium complexity projects or just general glue between systems and stop-gap measures for missing integrations. The individual components are simple, but the joining them together creates completely new things.
We’re currently up to 27 different examples for different use cases.
Anyway, let’s start!
Configuring the bot
First, lets create a chat room for the bot to be in. In Google Chat, create a space and note the space ID that is visible in your browser location bar (please note, we’ll need to replace the singular space/ with spaces/):

Then, check out the code from github.com/rosmo/cloud-deploy-bot. You’ll see that in the root directory there are some samples for a delivery pipeline that just deploys a simple hello world container image on Cloud Run. We’ll also want to check out the Pubsub2Inbox code under the terraform/ directory.
git clone https://github.com/rosmo/cloud-deploy-bot.git
cd cloud-deploy-bot/terraform
git clone https://github.com/GoogleCloudPlatform/pubsub2inbox.git
Next, we’ll create a terraform.tfvars in the terraformdirectory and fill it with the details of your project (please replace the variable contents with your details):
project_id              = "my-gcp-project"
region                  = "europe-west1"
cloud_deploy_region     = "europe-west1"
chat_space              = "spaces/AAAAgF_UG1Y"
delivery_pipeline_name  = "helloworld-app"
cloud_deploy_repository = "https://github.com/<your-org>/<your-repo>.git"
You probably noticed there is a repository specified at the last line. This repository will be checked out during the release creation and the YAML files are compressed and transferred to a storage bucket.
You should point this to your existing Cloud Deploy repository containing your skaffold.yaml file or if setting up Cloud Deploy for the first time, you could start off with the example ones in the repository (they are the same ones as in the quickstart guide Deploy an app to Cloud Run using Google Cloud Deploy).
If your repository is private, you can set up a SSH key for the git processor, see an example here: utilities-example.yaml
Deploying the bot
Now we are ready to deploy the initial functions by running Terraform:
# terraform init
# terraform apply
Outputs:

instructions = <<EOT
Please use the following Pub/Sub topic when configuring Chat API:
projects/my-gcp-project/topics/clouddeploy-chat
After a while, if everything went well, you should have 4 Cloud Functions deployed inside your project alongside with 4 Pub/Sub topics and some additional configuration, such as service accounts. If something didn’t work, you may need to adapt the Terraform code to your specific environment.
Turning on the Chat
Next, we will configure the Google Chat API and add the bot to a space.
- Make sure you have enabled the Google Chat API (the Terraform should enable it). From the API management screen, click Manage.
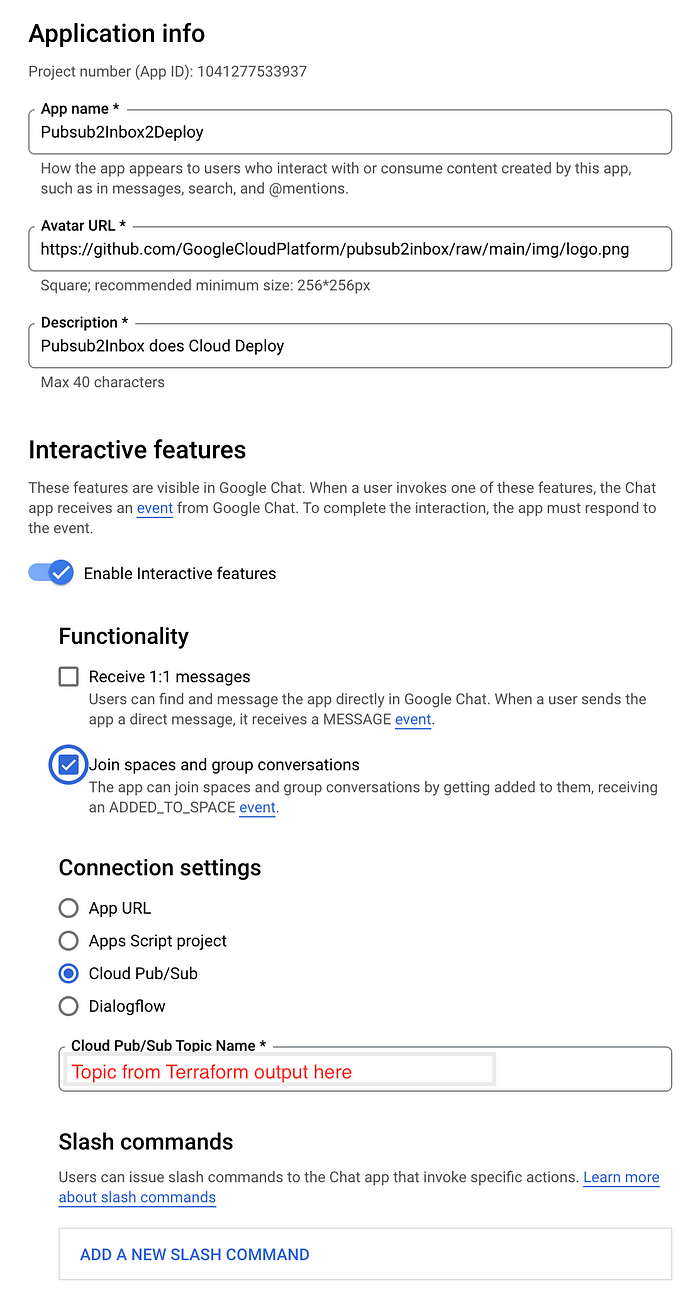
- The last option is a bit misleading as this works slightly different than in OAuth apps. The visibility box “Make this Chat app available to specific people and groups in <ORG>” would a trusted tester list, unchecked would mean that the chat app would not be available. We will cover releasing the application to your entire organization a little bit later.
- Also add the slash commands for the bot:

- Save and wait some time. It will take a while for the application to appear in chat for the people that you listed in the “specific people and groups”. Note that you may need to type almost the whole application name for it to appear.
- Create a Chat space and add the application. Now, if you check the Pub/Sub topic’s subscription (that Terraform created earlier), you should have a ADDED_TO_SPACE message there! (You can pull messages from the Pub/Sub subscription console UI) — Take a note of the Chat space ID, visible in either the Pub/Sub message on in your browser’s URL (/chat/space/AA….).
- Add the bot to your chat space.
- You should now be able to issue command such as:
/release new-release-001
/promote new-release-001 to run-qsprod
/approve new-release-001 rollout new-release-001-to-qsprod
Customizing the bot
While getting up and running is quick, you’ll want to customize the bot to fit your Cloud Deploy needs. The two main components that are involved in this are:
- The Pubsub2Inbox configuration pipeline: cloud-deploy-bot.yaml
- The Pubsub2Inbox processor: clouddeploy.py
The bot itself runs on 4 functions, one for each of the 3 topics where Cloud Deploy generates Pub/Sub notifications and one where Google Chat messages arrive to.
The Google Chat one does the heavy lifting by calling Cloud Deploy and the other three simply pick up notifications and turn them into chat messages. (Technically you could also split the configuration into just notifications and just actions, which would simplify the configuration file)
Have a look at the configuration file, there should be compherensive examples. For example, if you don’t prefer the cards -style messaging, you could replace everything with a simple text message.
Unpacking cloud-deploy-bot.yaml
The cloud-deploy-bot.yaml is roughly divided into three main active blocks:
- The command processing, checking which action is needed to be done (using setvariable processor)
- The Cloud Deploy commands, using clouddeploy processor
Let’s say that you want to add a new command, called /rollout , which would have a syntax of /rollout releaseId to environment . The code would look roughly something like this (if you do add this, don’t forget to add the slash command and the corresponding code that sets the command variable):
  - type: processor.clouddeploy
    # Sets some variables for this processor, useful if you want to repeat the same parameters
    variables:
      releaseId: '{{ (data.message.text|parse_string("/rollout {releaseId} to {targetId}")).releaseId|trim }}'
      targetId: '{{ (data.message.text|parse_string("/rollout {releaseId} to {targetId}")).targetId|trim }}'
    # Runs this only if command equals rollout
    runIf: |
      {% if command == 'rollout' %}1{% endif %}
    output: create_rollout
    config:
      # The ${} variables are replaced by Terraform
      region: ${cloud_deploy_region}
      name: ${delivery_pipeline}
      # For more information see: https://cloud.google.com/deploy/docs/api/reference/rest/v1/projects.locations.deliveryPipelines.releases.rollouts/create
      mode: releases.rollouts.create
      releaseId: |
        {{ releaseId }}
      rolloutId: |
        {{ releaseId }}-to-{{ targetId }}
      rollout:
        description: |
          Rollout created by {{ data.message.sender.displayName }}.
        targetId: "{{ targetId }}"
That’s it! Stay tuned for our next installment where we build a cool Slack bot purely on Cloud Functions and Pub/Sub.
Didn’t it work? Do you have an issue or want to send feedback? Reach out to me on Twitter for example: https://twitter.com/rosmo